Forward Motion 411
Search
  • Making College Count
    • Getting In
    • Campus Life
    • Getting Ahead
    • So You're Graduating...
    • Graduate Life
  • Life Coaching/ Motivation
    • Removing Roadblocks
    • Life Coaching
  • The Home Front
    • Recipes
    • Organize Your Life
    • Holistic Health
    • Fitness
    • Crafts and Hacks
    • Baby Time
    • Trollolol
  • Mediation
    • Mediation FAQs
    • Family Conflict
    • Corporate Conflict
    • Post-Divorce Survival Guide
  • Finances and Credit
    • Personal Finances
    • Your Good Credit
  • Contact Page
  • Contracted Services
  • The Shoppe

Creamy (Dairy Free) Mushroom Soup

4/10/2020

0 Comments

 
Picture
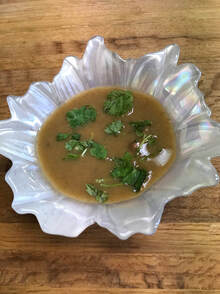
We love cream of mushroom soup! It's the perfect light meal on its own or a tasty addition to any casserole. But here's the problem. Commercial cream of mushroom soups are typically bland and contain ingredients (e.g., dairy, flour, etc.) many people can't eat. We went looking for a delicious, healthy, easy-to-make alternative to the commercial brands. This soup needed to burst with the dusky flavor of mushrooms without complicating lives. Can a mushroom soup be creamy without diary? Yes! Do you need to use flour to create the desired creamy texture? No! We found you the perfect recipe for a creamy mushroom soup that is dairy free, gluten free, and Whole 30 compliant. The secret to this creamy soup is the use of cauliflower. AND it's super fast and easy to make! You can choose to fill it with chunky mushrooms if you like that sort of thing - or just puree' it and enjoy!

Creamy (Dairy-Free) Mushroom Soup

2 T olive oil
1 medium onion, peeled and cut
5 garlic cloves, halved
1 small cauliflower, rough cut
½ C fresh cilantro, chopped
Salt and freshly ground pepper

1 t. Thyme
8 oz mushrooms - your choice - cleaned and coarsely chopped. Specialty mushrooms will make your soup more nuanced but we prefer regular button mushrooms.
4 C chicken stock or broth
3 C vegetable broth


1. Heat olive oil in a fry pan over moderate heat. Add onion, garlic and cauliflower, cilantro, and spices. Reduce heat to low, cover and cook until onion and cauliflower are soft; about 20 minutes.

2. Spoon approximately 1/4 of the vegetables into your food processor/Vita-mix (I used a regular blender and it worked wonderfully) and add a little vegetable broth. Blend until liquefied.  (If you add too many hot vegetables at once, the lid can blow off so be careful.) Pour liquefied veggies into soup pot as you go. 

3.  Saute' mushrooms. Spoon into food processor/Vita-mix and add a little vegetable broth - liquefy. (If you like chunks of mushroom in your soup, hold back approximately half of the sauteed mushrooms and add them to the soup during step 4.)

4. Add the chicken stock and the remaining vegetable stock to the soup pot. Simmer over moderate heat until heated. Remove from heat and let cool.

5. To serve: Ladle into serving bowls and enjoy the  best creamy mushroom soup you have ever tasted!                          
                                                                                                                                                  Makes about 2 quarts


0 Comments

Macaroon Joyeux

12/22/2016

0 Comments

 
Picture
​A macaroon is a cookie in any language. However, if you purchase a macaroon in France it will look like a very tiny 2-layer cake with filling (imagine a colorful, puffy Oreo) and it will be called a macaron. Some people love them. I do not.  They are made of crushed almonds, whipped egg whites, food coloring, and powdered sugar; they taste (to me, anyway) a lot like old-fashioned divinity.
 
My heart belongs to the crunchy-on-the-outside-and-moist-on-the-inside American variety of macaroon. It is largely coconut and heaven. Totally makes my mouth water to think about them and my thoughts subsequently drift toward my love of Almond Joy candy bars. It’s no surprise that I gave in and mixed the treats together on a snowy afternoon!

This cookie looks like a coconut macaroon but is extra tasty thanks to toasted almonds and chocolate chips.  Your friends and family are going to love this treat!
 
Tip:  When you separate the eggs, place the egg yolks in a small bowl. Stir them together and store for a day or two until you have time to make Pasta Alfredo (calls for egg yolks only) or Cooked Eggnog.  No time? Well, remember that 2 egg yolks = 1 egg in most recipes so don’t throw away your egg yolks!
 
Macaroons Joyeux
 
2          Egg whites
1          14 ounce bag of shredded, sweetened coconut
¾ C     Sweetened Condensed milk (add an extra 2t if you like them extra moist)
1t        Vanilla Extract
¾ C     Roasted Almonds; roughly crushed (I like the salted ones)
¾ C     Chocolate chips
 
Preheat your oven to 325°. Prepare your cookie sheet (any which way you prefer) to be non-stick. This means you can butter it, use parchment paper, or use a silicon mat.
 
In a large bowl stir together the coconut, milk, vanilla, almonds, and chocolate chips. In a separate bowl, whip the egg whites into stiff peaks. Fold the egg whites into the coconut mixture. 
 
Place mixture by teaspoonfuls onto prepared cookie sheets. Your cookies should be approximately the size of a ping pong ball. Bake for 20-23 minutes, turning cookie sheet halfway through the baking process to ensure even toasting of the coconut.

Let them sit for a minute after removing them from the oven and then transfer them to a cooling rack. If you let them cool completely without removing them from the pan, they may become “glued” to the pan (and nobody has time for that).

0 Comments

Cinnamon Twists

12/15/2014

0 Comments

 
Cinnamon Twists are the best bread sticks ever!
Happy memories of eating at The Pie in Salt Lake City, Utah. It's a dank underground hang-out that makes some of the best pizza in the United States.  Spend some time there and you'll find yourself writing on the walls, choosing some music from the jukebox, and wishing someone (especially that cute guy in the corner) would just look back. Always order a smaller pizza than you intended so you have some room for their delicious Cinn-A-Part dessert pizza. It is heaven where heaven would never dare tread. Or come to my house and I'll make you my version - I call them Cinnamon Twists. They're reminiscent of your visit to The Pie and you'll be glad you came by for a visit.  But please don't write on the walls.

Cinnamon Twists
Dough:
1 C             Warm Water
2  t             Yeast (If you use yeast cakes - use one cake)
1½  T         Sugar
2  T            Oil
1 t              Salt
2 ½ - 3 C   Flour

Mix the water, yeast, and sugar. Let it set until the yeast activates (5 minutes).  Using a mixer with a dough hook, add oil, salt, and 1 C flour. Mix well. Add flour ½ cup at a time until the dough is slightly sticky and no longer clings to the bowl.  No need to let it rise.  Roll the dough thin into a rectangle shape. Cut the dough into ½ inch strips.

Do the Twist:
¾  C    Sugar
1   T    Cinnamon
½  C  Butter

Preheat oven to 375°.  Melt the butter in a shallow bowl.  Mix the sugar and cinnamon on a large plate.  Dredge a dough strip in the butter. Coat it well in the cinnamon mixture.  Fold the strip in half (I stretch it a little) and twist it.  Place on  a parchment-lined cookie sheet (you can skip the parchment if you’d like but it helps with clean up).  Repeat, repeat, repeat.  Cover and let rise for 15 minutes.  Cook for 40 minutes. They will still look a little pale but the edges and tails will be golden.

Icing

While the twists are cooking, mix:
1  C      Powdered sugar
1½  T Milk
½ t      Vanilla
with a fork.  When the twists come out of the oven, drizzle the icing over them and enjoy!


                                                                                                                                             Makes 10-12 twists.


0 Comments

TOMATO SOUP (FROM SCRATCH)

10/8/2014

0 Comments

 
Picture
I was sitting in the waiting room, waiting for my daughter’s MRI to be completed. I was in distress: worried about her health, worried about getting the reading done for my graduate class, and worried about what to make for dinner.  An angel sat down beside me and took out her crocheting. We began to chat.

As we chatted about the weather, her needlework, MRIs, and kids the topic naturally drifted toward dinner.  I don’t know about you, but I find it difficult to keep nutritious meals (a.k.a. not McDonalds) on the table every night. She mentioned she had made fresh tomato soup for dinner. 

Trying to not appear insanely jealous, I casually asked for the recipe and quickly jotted it down on my journal article (preparation for class).  I have never copied this recipe off of my journal article until just this moment. Every time I make this soup, I think about the nice lady who generously shared her time and her recipe with me on a day when I thought nothing good could happen.  She makes me smile every time I make it.

Tomato Soup (from scratch)

1         Yellow onion
1-2      Garlic cloves (minced)
2 T      Butter
2 T      Olive Oil
6         Tomatoes (medium: peeled and cut into wedges)
6 C      Chicken Broth
1½ C  Cream or Half &Half

Melt butter in a large fry pan and add the olive oil.  Add onion and garlic and saute’ until the vegetables are soft.   Add tomatoes and ½ C chicken broth.  Simmer for 5 minutes.  Remove from heat and let cool.

Using a food processor or blender, pulverize the tomato mixture and pour into a large saucepan.  (Warning: if you attempt this step with a hot mixture, you will end up wearing it and cleaning it off your ceiling. I was impatient and tried it once: don’t do it!)** Add the remaining 5½ C. of chicken broth into the mixture and heat.  Add the cream/half & half just before serving. 

 
                                                                                                                                               Makes 6-8 servings

*If you want to make some of this soup for winter, stop at this point and freeze or can the tomato mixture. On a cold winter day, add the chicken broth and cream for a quick, healthy soup that will remind you of fresh summer gardens and sunshine.


0 Comments

Applesauce – Your Secret Recipe

10/1/2014

0 Comments

 
Applesauce - Make It Your Favorite Recipe
I made applesauce yesterday and it is delicious! It doesn’t taste like that yucky, bland stuff they sell in the store. I’ve often wondered how they make theirs taste so bad! Mine tastes a lot like apple pie – without the crust. When my children were babies, I would feed them homemade applesauce instead of commercially processed baby food and they still love it today!  It’s that good.

This is your secret recipe for applesauce because (here’s the secret) there is no true recipe for applesauce.  If you get the right apples, you honestly can’t go wrong!  Applesauce is super easy to make; especially if you use a Victorio Food Strainer and Sauce Maker to do the peeling, coring, and mashing for you.  Read here to learn why you need one of these.

If you plan to can this stuff (which I highly recommend) 1 bushel of apples will render about 20 quarts of applesauce.  Also, fyi, a paper grocery bag filled with apples is approximately ½ of a bushel. That information comes in handy if you’re picking your apples off the tree in your backyard. If you aren’t into canning, you can make a small batch of applesauce – just use 10-12 apples and get cooking! 

 Okay, here is what you need for your secret recipe:
  1. Wash and quarter your apples;
  2. Place them in a large pan with plenty of water and cook for 15-20 minutes. They should be the consistency of a ripe pear when they’re ready;
  3. Use your Victorio  strainer to peel, core, and sauce the apples. Hey, I would never ask you to do anything I wouldn't do and I wouldn't peel and core them by hand.  You can if you really want to, but you would need to make that part of Step 1;
  4. Taste your sauce – add sugar (white, raw, brown – your choice) to taste. If I need it, I start with ½ cup sugar and go from there. Golden Delicious apples usually need more sugar than McIntosh;
  5. Add cinnamon if you wish. I add about ½ Tablespoon – taste it – and go from there.
  6. Add 4T lemon juice (per quarter bushel) if you are using windfallen fruit and are canning. This increases the acidic level of your fruit to keep it fresh. Apples picked off the tree do not require lemon juice as they come by a higher acidic content naturally.
  7. Add an optional pinch of nutmeg just to make it interesting.
  8. Bottle and process.
  9. Enjoy!


Here are a few tips:

  • Use McIntosh or Golden Delicious apples. These make the very best applesauce.  The McIntosh is a sweeter apple and you may not even need sugar is you decide to use this apple. It’s in season in late September and early October. The Golden Delicious apple makes an applesauce that is a little tart. If you love a tart apple pie (not to be confused with an apple tart), this is the apple you want to use.  If you prefer sweet applesauce, you can use golden delicious apples and simply add more sugar. It makes a very yummy sauce!

  • Don’t waste your money on the perfectly shaped apples. You’re going to grind them up! This year I could choose between perfect, pretty Grade A apples ($39 for half a bushel) and less pretty Grade B apples ($9 for half a bushel).  This can save you a ton of money!
 
  • Use a Victorio Food Strainer to save yourself time, grief, and shriveled fingers.   There is also another brand, Norpro, that costs about the same – or more – but doesn’t look like it has a lot of the features that I enjoy with my Victorio.  They both sell for just under $50.  If you like lumpy applesauce, pick up the Accessory Kit that contains the Salsa Maker screen. I just use the screen that comes with it originally and, if I want lumps, I hand mash a few apples and add them in to the mix.

0 Comments

Rice Pudding 

8/31/2014

3 Comments

 
Rice Pudding is worth the time!
Have you had a chance to treat yourself to Rice to Riches?  It’s a specialty pudding store in New York that exclusively sells rice pudding.  I love rice pudding!  They sell around 20 different flavors; the Rum Raisin is my favorite.  But I’m not always in New York so I’ve had to learn to fend for myself.  If you love rice pudding, you’ll want my recipe!  If you’ve never tried rice pudding, this is the recipe you want!

My first attempts to find the perfect rice pudding recipe left me overwhelmed. Some recipes called for cooked rice while others called for uncooked rice. Then the rice aficionados want to discuss which grain of rice to use and how to cook the pudding – baked or boiled.  Next, I ran into a discussion regarding whether I should use a vanilla bean or just dump in some vanilla extract in the end. To be honest, I gave up my quest and settled for a candy bar.  “Aint nobody got time for that!”  But my most recent visit to Rice to Riches inspired me to again seek the perfect pudding recipe.  I  got busy in the kitchen and can now answer all of those pesky, overwhelming pudding questions while simultaneously presenting you with  - (what?) – the best rice pudding recipe ever!  First, I’ll answer the questions:

  • Baked or boiled?  Everyone who participated in my taste test preferred boiled.  The boiled version is more pudding-like, while baked rice pudding is more like a lumpy custard. 
  • Double boiler?  Yes! Use a double boiler to prevent scorching. Cooking your pudding over direct heat is possible but isn't recommended.
  • Which grain of rice?  Medium grain is best but long grain rice is pretty great, too. There wasn’t a ton of difference, to be honest.
  • Vanilla Extract or Vanilla  Bean?  Definitely use the vanilla bean. The taste is amazing and the tiny freckles left by the bean makes the pudding look sweet.
  • Raw or cooked rice?  Use recipes that call for raw rice. When rice is cooked in the pudding mixture, it picks up the flavors of the pudding.  Already-cooked rice stands out as a separate entity in the pudding; which is distracting.  

A delicious rice pudding has just the right amount of creaminess and spice.  Rice is its own thickening agent – which is what provides the creaminess in this dessert. This pudding (like most old fashioned puddings) is a little time intensive – it will take you approximately an hour of constant stirring.  So grab a loved one to take turns with the stirring or pick up a good book to distract you.

Rice Pudding

4   C    Milk (I used 2% but Whole Milk works, too)
1          Vanilla Bean
½  C    Medium Grain White Rice (uncooked)
pinch   Salt

½ - C     Raisins (use more if you really like raisins)
2          Egg Yolks
¼  C    Sugar
¼   t    Cinnamon (add a pinch more if you really love cinnamon)
¼   t    Nutmeg

Using a double boiler, stir the Milk, Vanilla Bean, Rice, and Salt over medium-high heat for approximately 50 minutes, stirring (for the most part) constantly.  The mixture will magically thicken and look like a pudding – waiting for this to occur is the trick.

As soon as the mixture has thickened, add the raisins and simmer for 5 more minutes.  While the raisins simmer, mix the egg yolks, sugar, cinnamon, and nutmeg in a separate bowl.

Whip ¼ C of your hot mixture into the egg yolk mixture. This will temper the egg mixture (i.e., keep the eggs from cooking when you mix the two together).  Now add the egg mixture into your double boiler and stir well.

Remove the vanilla bean, cut it lengthwise, and scrape it.  Add the scrapings into the pudding and – voila’ – you are ready to enjoy your pudding! (This can be served either hot or cold. You choose.)


                                                                                                                                 Makes approximately 8  servings

3 Comments

Pulled Pork Barbacoa (Café Rio Style Pork)

2/2/2014

0 Comments

 
Pulled Pork Barbacoa like Cafe' Rio
Cafe Rio is a fairly new Fresh Mex restaurant that features only the best food in town! If you live on the East Coast, your only exposure to this guilty pleasure can be found in Maryland and Virginia. But you who live in Colorado, California, Arizona, Utah, Idaho, Montana, Washington,and Nevada know what I'm talking about. Taste it once and you'll be back for more....and more and more.

There is a lot of delicious food on the East Coast but Mexican food - good Mexican food in general is not easy to find. And the Midwest?  Please. 

If you know of a fabulous Mexican food restaurant near you, please leave it's name and location as a comment so we can all enjoy! In the meantime, try out this recipe for Pulled Pork Barbacoa. Barbacoa may be a little misleading since this meat isn't steamed to tenderness. But still. 

After searching high and low for the perfect recipe, we finally found it!  We never post a recipe we haven't made and tried. It took some searching (thanks, Mom)- and finally some tweaking of a fairly decent one we found - to get this to you.

Pulled Pork Barbacoa
4 lb  Pork roast
2 C    Medium salsa
2 C    Brown sugar
1½ C Dr. Pepper or Coke
½ T    Cumin
1 can  Diced green chiles (7 oz)

Cook roast in water and 1 t salt (to cover) for 4 hours over medium heat (use crock pot if desired).  Remove roast and discard water, reserving 1 C of water. Cut roast into thirds and place in the bottom of the pan or crock pot. Mix the remaining ingredients together and pour over the roast.  Add tap water to cover and cook over low hear Pour out water reserving about a cup in case the final pork is dry. Cut roast in thirds and put it back in the crock pot. Cook over low heat for 4 more hours. Using forks, shred pork (remove any fat and discard).  Add pork back into  the juice and add extra cumin to taste.  

Use this pork in tacos, burritos, chimichangas, enchiladas, tostadas, and quesadillas. Or just slide it into a toasted bun and enjoy it! You won't be sorry. This is really good stuff! 

If you prefer, you can roast this pork.  To do this, pour the mixture over a raw roast, cover and bake at 325* for three to four hours.


0 Comments

Shortbread Cookies

12/26/2013

0 Comments

 
Shortbread Cookies
These cookies are fun for the family as a quick after dinner treat or you can whip them up to share with your book club. The simple, crunchy cookie is filled with a buttery taste accented by a breath of salt – unusual and delicious. I used a glass with a star-patterned bottom as my press; it left our cookies looking like adorable, edible sand dollars.  The batch will yield approximately 4 dozen cookies so share them with your friends and neighbors.
Shortbread Cookies
Ingredients:
1    C   Butter (room temperature)
¾   C   Vegetable Oil
1¼ C   Granulated Sugar
¾   C   Powdered Sugar
2    T    Water
2    t    Vanilla
2         Eggs
½   t    Baking Soda
½   t    Cream of Tarter
1    t    Salt
5½ C  Flour

Cream together Butter, Vegetable Oil, Sugars, Vanilla, Water, and Eggs.  Combine dry ingredients and slowly add to mixture. Your dough should be smooth yet not at all sticky.

Roll dough into golf-ball sized balls and place on your cookie sheet.  (Do not make the balls smaller, this is the secret of this recipe. The cookies need to be thick to taste right.)

Mix ¼ C sugar and ¼ t salt on a saucer.  Choose a drinking glass or cookie press – press it into some of the dough to get it a little sticky. Now dip it into the sugar mixture and then firmly press into the center of each dough ball; pressing until the dough is about ¼ inch thick (i.e., thicker than regular pressed cookies). Your dough will crack a bit and smoosh out beneath the edges of your press. Remember to dip your press into the sugar/salt mixture before you smoosh the next dough ball!

Bake at 350° for 10-12 minutes. The cookies should just barely be browning around the edges. Move the cookies to a cooling rack and try not to eat them all before they cool.  Makes about 4 dozen cookies.


0 Comments

Cooked Eggnog - The Best You'll Ever Taste

12/8/2013

0 Comments

 
Best Egg Nogcture
If you’re like me, eggnog is an inevitable Christmas tradition.  Eggnog purchased at the store is delicious, until you read the packaging and realize it’s chock full of High Fructose Corn Syrup and stabilizers. Then it doesn’t taste quite so traditional. But it’s Christmas!

We set about finding perfect egg nog recipe just for you. It needed to exceed the goodness of store-bought egg nog, lack high fructose corn syrup, and be safe. It’s still fattening and yummy and it’s alcohol-free (so you can decide if you want to add the brandy or not). We succeeded! Even people who don’t like egg nog have liked this recipe.  This is by far the best eggnog you will ever taste!   


Eggnog
5           Eggs*
¾  C     Sugar
2   t      Vanilla Extract
2    C   Whole Milk
2    C   Heavy Whipping Cream**
¼   t     Ground Cinnamon
¾   t     Ground Nutmeg

Whip the eggs, sugar, and vanilla together until creamy. (If you kind of hate the slurpy egg whites, use an electric mixer to whip this mixture.) Pour into a double boiler and add the whole milk. Cook to 160 degrees (if you aren’t using a thermometer, the mixture will coat your stirring spoon and be about as hot as a cup of cocoa).  Remove from heat and slowly stir in the Whipping Cream.  Add the ground cinnamon and nutmeg. Pour into a container and refrigerate until cool (but save one mug of it for instant enjoyment as this drink is delicious both warm and cold).  If you like, add whipped cream, alcohol, extra milk, whatever when serving.

*If you used egg whites for Thanksgiving, you can make this egg nog using the remaining yolks.  2 yolks = 1 egg. 

**We tried this recipe using 2% milk and half-and-half in an effort to reduce fat. The eggnog is thinnish and just not as good - but better than nothing.

Makes 5 cups

0 Comments

Peppermint Patties 

11/20/2013

0 Comments

 
Make Peppermint Patties as a Gift
This is what we’re talking about. Candy! Yummy candy that isn’t…well, isn’t as bad for you as that candy you get at the store. We bet you didn’t know you could make this candy at home for pennies – and minus the High Fructose Corn Syrup that is in everything (because it’s so cheap) and so bad for you (because it makes you fatter).  You don’t have to meet a profit margin when you’re at home, so you can make your candy with real food products. You can make it fun! We whipped up the filling for these Mint Patties in minutes, watched a movie we’d been dying to see, and then finished them up before bedtime. Fabulous bedtime snack! 

They don’t have to be refrigerated. They can just hang around the kitchen on a plate until they’ve disappeared. This will probably take less than 24 hours.  If you want to make them for a party, you can whip up a few batches of the mint filling and leave it in the freezer for a week or two. Then finish them up the night before. Not only are they incredibly tasty and better for you than commercial products, they’re impressively cute!  

 Peppermint Patties

2 ¼  C  Powdered Sugar
2      T  Cream
2      t   Peppermint Extract
2      T   Butter

The cardboard tube from a roll of paper towels
Plastic Wrap (i.e., Saran Wrap)
Chocolate for dipping (Milk chocolate works great but we preferred the Dark Chocolate by Guittard)

Filling

Using a paddle on your mixer, mix all ingredients except the chocolate.  The mixture will be heavy and not sticky.  Take the filling out of the mixing bowl and knead it into a long tube shape.  Place it on plastic wrap and wrap it; taking care to ensure the ends are secured.

Cut the paper towel tube lengthwise and place the filling inside. Secure the cardboard tubing around the filling and secure it with tape. (Check out the picture at the end of this recipe; we know this step is difficult to imagine.)   Let it chill in the refrigerator for at least 45 minutes before dipping.

Chocolate

During this time you can temper your dipping chocolate.   (You can purchase the perfect chocolate at a reasonable price here.)   

Dipping

Remove the chilled filling from its cardboard cocoon and slice it into about 36 pieces.  Using a fork, place a peppermint wafer in your chocolate, flip it, flip it back over, and flip it once more (so each side is in the chocolate twice).  If your patties start to soften, put them back in the fridge for a few minutes. Move your patty to parchment or waxed paper to set.


Peppermint Patties are easy to make.
Demonstrating how to secure the wrapped filling inside of the paper towel tube to keep it from going flat on the bottom.
0 Comments
<<Previous

    Recipes

    All
    Alfredo Sauce (Olive Garden)
    Apple Dumplings
    Applesauce
    Baked Chicken With Sweet And Sour Sauce
    Baked Mac & Cheese
    Banana Bread
    Berry Cobbler
    Chicken Broth
    Chicken Tortilla Bake
    Cilantro Lime Chicken
    Cilantro Roasted Salmon
    Cinnabon Cake
    Cinnamon Twists
    Corn Fritters
    Desserts
    Eggnog
    German Lace Cookies
    Homemade Tortillas
    Know Your Chocolate
    Oatmeal Cookies With Raisins And Chocolate Chips
    Parmesan Bread Sticks
    Peppermint Patties
    Potato Salad
    Pulled Pork Barbacoa
    Pumpkin Bread
    Rice Pudding
    Salmon Patties
    Soups
    Spinach And Strawberry Salad
    Temper Chocolate
    Tomato Soup
    Ultimate Soup
    Vanilla Extract

    RSS Feed

    Subscribe to our newsletter